Online assessments can be challenging simply from a logistics point of view. In our district we are fortunate to have a large number of desktop computers as well as laptops to use for testing. However, one of the first questions that we had to answer was whether our laptops could make it through a day of testing. Sadly the answer has been no. While, we believe that 99% of our devices could indeed make it through the testing schedule, we didn’t want to risk even a couple of students being knocked off of a test due to a laptop battery.
Obstacle 1: Laptop power
Solution 1: Embarrass yourself by buying a crazy number of power strips and extension cords from our local hardware stores
The second problem we came across was a problem with the test and our laptops. We primarily have Dell Latitude laptops. Unfortunately, part of the PARCC exam locks down the computer when the student logs into the test. All of our touchpads were disabled.
Obstacle 2: Touchpad issues with Dell Latitude laptops
Solution 2: Buy an unreasonable amount of external usb mice
The PARCC web site has provided us with what they term “Technology Guidelines”. Pearson, in knowing that System Administrators love change has released 5 separate documents in the past year.
Version 4.4, January 2015
Version 4.3, November 2014
Version 4.2, May 2014
Version 4.1, May 2014
Version 4.0 February 2014
The Guidelines specify wonderful information such as minimum requirements to use the test. Obviously this is important stuff! What they fail to give you is the full picture or any warnings.
So what really mattered for us out of the guidelines were the following.
- Operating System
- Memory
- Screen Size
- Browser
- Java
- Web filtering
The first 3 were not a concern for us. We are running Windows 7 64bit and Windows 8.1 64 bit. All computers have at least 2 gigs of memory and all screens are a minimum of 12 inches. It is worth noting that screen size could easily be an issue. The specifications state a 9.4 inch screen which takes most smaller tablets out of the equation.
So, the remaining three.
Browser
We have standardized on Google Chrome. Our version is not updated during the year and we are currently at version 35. We just barely made it under the wire with this one. It currently states that we must have between version 35 and 39. Now, is a good time to mention one of times where a warning might have been nice. Google is in the process of removing their old plugin API. This will be phased out in 3 separate milestones this year. This first of which took place in January. Although we have selected Chrome for our first round of testing, it is almost guaranteed that we will move to Internet Explorer for the second round of testing this Spring. The plugin architecture directly affects our ability to manage and run Java in the browser. So with no further ado.
Java
Java is simply a nightmare. In our district, we update our systems during the summer for the following year. In May of 2014. we settled on Java 7 update 55. Since that time, Java 7 had a few more updates with update 67 being the last. However, Oracle released a new major version with version 8. Version 8 also has had a few updates and is currently at 31. We are constantly balancing whether to upgrade or whether to stay at our current version during a school year. In the case of Java it has almost always been the best decision to stay with one version for one calendar school year. It just simply affects too many web sites that our students use regularly. So, the big question, is 7 update 55 compatible with the test? Yes. The guidelines state that Java 1.6 is required in Google Chrome. Java 1.6 is actually referring to Java 6 and 1.7 refers to Java 7 etc.
Web filtering
This one was easy for us. We run a Lightspeed Rocket for our internal web filter. As instructed in the guidelines, we unblocked a wildcard url of *testnav.com for both port 80 and 443. The last version of the guidelines also adds new urls of *.pearsontestcontent.com, *.thawte.com, and *.google-analytics.com.
So, does all of this work out of the box? No.
Obstacles
The first obstacle were the Java prompts. Essentially, these boiled down to two prompts.
- Java prompt to upgrade
- Java prompt whether to trust and run the current application.
If you ask Pearson (we have), they simply suggest that the students should know how to answer the prompts correctly. This is plain insanity. Let’s look at prompt 1.
Java will be permanently stuck in an upgrade loop if a student accidentally clicks to upgrade now, which seems like a reasonable choice. Not a good solution to require the student to make the choice. They aren’t being assessed on their ability to properly answer Java prompts.
Note: If this has happened to you, it is reversible with a registry key change. Refer to Symantec’s web site
Java prompt 2 is whether to run the current application. This is the tricky one and the one that even calls to Pearson could not resolve. Essentially, what a Sys Admin needs to do is to log into the desired testing site, log on with a user account and when prompted, select “Run” along with selecting the “Do not show this…” checkbox at the bottom of the dialog. Shown below is the prompt from the systemcheck web site.
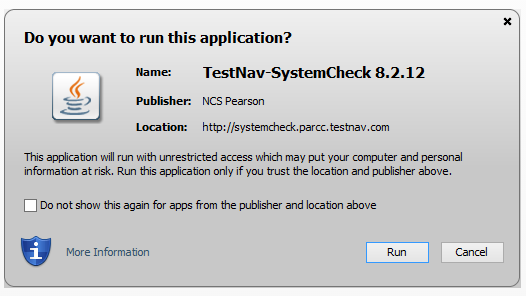
By checking the checkbox, Java will store the certificate in a file named trusted.certs. We can then use this file later to prevent the dialog for other users. The file is located in the current user’s appdata\LocalLow\Sun\Java\Deployment\security directory. You can use the wildcard %appdata% which will by default go to appdata\roaming and then simply go back one directory to find the locallow directory in Windows Explorer. I highly recommend that you delete the trusted.certs file before visiting the site(s) that you are harvesting certificates from. This will ensure that you are only bypassing the dialog for the testnav web sites.
So, no problems right? Well, it turns out that the accepted certificates in the trusted.certs file explicitly list the full web site that you are running when you select “Run” on the Java dialog. This means that if you do this on the systemcheck site, it will still prompt on the actual state testing site, or the practice site. OK, so now what? You just repeat the steps with the other sites, right? Ideally, yes, in reality no. Java doesn’t run until a user logs in. Unfortunately, you can’t log into the state testing site without a real user login (impossible) and you can’t harvest the certificate without logging in. This leaves us with the nice old paradox of which came first, the chicken or the egg.
There is obviously a way around this, but Pearson apparently failed to document it or communicate this to their technology support staff. Type “username” for the username and “password” for the password. This is provided at the bottom of the “test” site when you run the system check but we never dreamed that it would be available on our actual state testing site.
Wrapping up
We have talked about a few gotchas, files, and registry keys. I’m guessing that some of you are asking how to put it into actual practice. For our district, we decided that Group Policies are the easiest solution. Here are some of the settings we are using. Keep in mind that this is a work in progress. You’ll notice keys for Internet Explorer etc. which aren’t being currently utilized but are planned on for the future tests.
- Create one or multiple accounts for testing. The group policy changes are almost exclusively user based policies.
- Create a group policy that has the following policies applied to it.
- Disable fast user switching
- Computer Configuration/Administrative Templates/System/Logon/ (Hide entry points for Fast User Switching)
- Google Chrome enabled plugins
- User Configuration/Administrative Templates/Google/Google Chrome/ (Specify a list of enabled plugins). Add Java* to list
- User Configuration/Administrative Templates/Google/Google Chrome/Content Settings/ (Allow plugins on these sites). Add *testnav.com
- Templates/Google/Google Chrome/Content Settings/ (Allow popups on these sites). Add *testnav.com
- User Configuration/Administrative Templates/Windows Components/Internet Explorer/ (Do not allow users to enable or disable add-ons) enabled
- User Configuration/Administrative Templates/Windows Components/Internet Explorer/ (Pop-up allow list) add http://*testnav.com and https://*testnav.com
- User Configuration/Administrative Templates/Windows Components/Internet Explorer/ (Prevent performance of First Run Customizate settings) Go directly to home page
- User Configuration/Administrative Templates/Windows Components/Internet Explorer/Accelerators (Turn off Accelerators) enabled
- User Configuration/Administrative Templates/Windows Components/Internet Explorer/Internet Control Panel/Security Page/Internet Zone/ (Java permissions) Enabled, set to Low Safety.
- User Configuration/Preferences/Windows Settings/Registry
- HKEY_LOCAL_MACHINE\Software\Policies\Google\Chrome\EnabledPlugins (Java*) String
- HKEY_LOCAL_MACHINE\Software\JavaSoft\Java Update\Policy (EnableAutoUpdateCheck) DWORD 0
- HKEY_LOCAL_MACHINE\Software\JavaSoft\Java Update\Policy (EnableJavaUpdate) DWORD 0
- HKEY_LOCAL_MACHINE\Software\JavaSoft\Java Update\Policy (EnableAutoUpdateCheck) DWORD 0
- HKEY_LOCAL_MACHINE\Software\JavaSoft\Java Update\Policy (NotifyDownload) DWORD 0
- HKEY_LOCAL_MACHINE\Software\Wow6432Node\JavaSoft\Java Update\Policy (EnableJavaUpdate) DWORD 0
- HKEY_LOCAL_MACHINE\Software\Wow6432Node\JavaSoft\Java Update\Policy (NotifyDownload) DWORD 0
- HKEY_LOCAL_MACHINE\Software\Wow6432Node\JavaSoft\Java Update\Policy (EnableAutoUpdateCheck) DWORD 0
- HKEY_CURRENT_USER\Software\AppDataLow\Software\JavaSoft\DeploymentProperties (deployment.expiration.check.enabled) String false
- User Configuration/Preferences/Windows Settings/Files
- Copy Java files to global and local areas
Step 10 can use some clarification. We previously mentioned how to create the trusted.certs file. We grabbed that along with deployment.config and deployment.properties file and stored them in our Netlogon share. You could alternatively store them in another location as long as all users have access to them.
Java’s setting files can be in two locations. User based and a global location.
Global: C:\Windows\Sun\Java\Deployment
User: C:\Users\%username%\appdata\LocalLow\Sun\Java
We wanted to simply use the global location. But during testing, it was obvious that it wasn’t working. Opening the Java control panel would solve the issue but this seemed clunky to automate. In the end, we confirmed that by opening the control panel, Java will take the information from the files and set registry keys. So, we simply created the registry keys we needed to ensure that our changes took affect immediately. We also in the end stored our files in both the user and global areas even though this is completely redundant.
Here are the files we used. We have not provided the trusted.certs file simply for security. It is prudent for you to create the file for yourself.
deployment.properties
#deployment.properties
deployment.expiration.check.enabled=false
deployment.webjava.enabled=true
deployment.security.level=MEDIUM
deployment.security.level.locked
deployment.security.mixcode=HIDE_RUN
deployment.javaws.autodownload=NEVER
deployment.user.security.exception.sites=c\:/Windows/Sun/Java/Deployment/exception.sites
deployment.system.security.trusted.certs=c\:/Windows/Sun/Java/Deployment/trusted.certs
deployment.config
deployment.system.config=file\:C\:/Windows/Sun/Java/Deployment/deployment.properties
deployment.system.config.mandatory=true
exception.sites (You can’t use wildcards in this file)
http://oh.testnav.com/
https://oh.testnav.com/